By following the simple steps that we will explain in this article, you will be able to fully backup your iOS devices such as iPhone and iPad. Join Virlan to learn how to backup your Apple devices on iCloud and iTunes.
backup your iPhone, iPad and Apple Watch
If you care about the pictures, videos, and other personal data on your Apple device, it’s best to back up your iPhone, iPad, and sports data on your Apple Watch! After this article, you can protect your personal data when you lose your iPhone, iPad ore Apple Watch.
Why is backing up iOS devices so important?
iPhone and iPad are among the most important and valuable assets we have. Aside from its financial value, the iPhone or iPad is a small piece of aluminum, silicon, and glass that is the central repository of important documents and memories. Moreover, sometimes we have such special memories that we may only encounter once in a lifetime!
By backing up your valuable data, you can protect them. If some one steal your phone, some damages happen, or you leave it in the back seat of a taxi, you still get a change to retrieve your data! Also when you buy a newer model, you will be able to quickly and easily transfer all your data to it.
Fortunately, there are many solutions for storing information in the cloud, Windows PC and Mac, each of which is very simple and completely free.
With Apple’s iCloud service, you can sync your iPhone and iPad important data permanently with web services. Plus, with iTunes, you can easily back up your Apple device with one click.
In addition to the above, there are other third-party services that offer a variety of cloud-based service options. As a precaution, we recommend that you use at least two available options. This way, in the event of an unexpected event you’ll be sure to have your data.
Apple provides users with simple tools for backing up your iPhone.
Differences between iCloud and iTunes backup
There are many ways for users to back up their iOS devices, one of which is to use the iCloud service. Of course, iCloud has many limitations and weaknesses. The data encryption policy is one of those limitations. iCloud provides Apple with the decryption key. In addition, you will have a 5 GB iCloud space limit. However, you can increase it to 50 or 200 GB or even 2 terabytes in exchange of a fee.
also read :
Buy One, Get One” deal for all the iPhone 12 models !
When backing up using iCloud, the user’s purchase history of the app, book, movie, music, and series is saved, but after the backup is restored, the purchased content will not be downloaded automatically. In addition, iCloud backup process will not save these data:
- Content purchased through iTunes
- Photos which are not saved in Photos
- Call history
- Home screen configuration
- Other data
Finally, you need iTunes to make a full backup of your iPhone.
iCloud and iTunes backup
If you use the iCloud path to backup, you have a simple process ahead. Further more, you do not need a separate computer. Later versions of iOS have completed iCloud backup. Newer versions save the following:
- Application data
- Apple Watch backups
- Device settings
- Homepage
- SMS, MMS and iMessage messages
- Photos and videos (unless you save them to iCloud automatically)
- Purchase history of Apple services including music, movies, series, apps, and books (excluding original purchased content)
- Sounds
- Visual Voicemail password (which requires the original SIM card used during the backup)
As we mentioned, Apple has the iCloud backup encryption and decryption key. That’s why using iTunes backups will make you more secure. This way, Apple does not have access to the data decryption key.
iTunes Backup does not include the following:
- iTunes content and App Stores
- PDF files downloaded directly from Apple Books
- iTunes-compatible content, such as MP3 or CD files and videos imported from iTunes
- Data such as photos, notes, files, reminders, and more which are stored in iCloud
- SMS, MMS and iMessage that are automatically saved in iCloud.
- Face ID or Touch ID settings
- Apple Pay info and settings
- Apple Mail data
- Activity, Health and Keychain data (unless you select the iTunes encrypted backup option)
iTunes apps, purchases, and PDF files can be restored using a Sync Content feature. This is why many experts do not consider backing up using iCloud alone to be a good decision.
Finally, the best decision is to use iTunes and iCloud at the same time, which saves everything. You can make daily backups using iCloud if you do not have access to a computer.
Follow the steps below to make a backup copy of iPhone data on Windows and Mac.
1- Update iTunes on Mac or Windows
Before backing up your iTunes application on a Mac or Windows, you need to have the latest version on your computer. Depending on the operating system you use, the upgrade and installation steps will vary.
Install and upgrade iTunes on Mac
You must have at least iTunes 12.9.5, which is available on macOS Mojave 10.14.5 and 10.14.6. To check for current versions, log in to System Preferences and select System Update to see the operating system and app updates. If the operating system and applications are not up to date, the process will run automatically on the Mac.
Install and update iTunes on Windows
You must have at least iTunes 12.10.7.3 on your operating system. You can download the latest version of iTunes from the Microsoft Store. If you do not have access to the Microsoft Store, download it from Apple’s official website .
If you download iTunes from the Microsoft Store, it will update automatically. If you download the app from the Apple website, go to Help in your iTunes menu and then Check for Updates to see the current version.
2- Connect and find iPhone on Mac or Windows
Connect your phone to your MacBook, iMac, Mac Pro, or any other Mac computer using Lightning Cable. The same goes for Windows. Depending on the device you are using, you will need a USB Lightning cable or a USB-C Lightning cable. If the connection is successful, iTunes will run automatically on the PC. Of course, this is not always the case and you may have to run the application manually.
After connecting the phone to the computer, you may encounter the message Unlock iPhone to Use Accessories. In such cases, unlock the phone with the fingerprint sensor or face or password. Then another message may appear on the phone, on which you must select the Trust This Computer option.
Next, click the iPhone-shaped button at the top of iTunes. If you do not see this icon, you may be having trouble connecting your phone to your computer. After clicking on the icon, click on Summary in the new window.
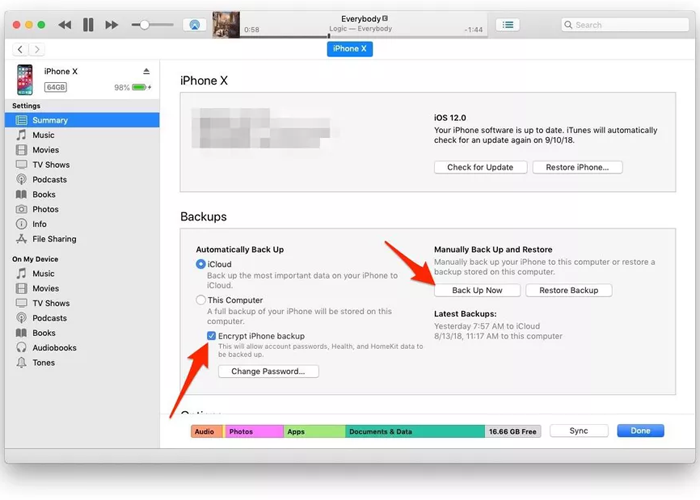
3- Select a backup option
In the new window in the Backup section, you have two options for backing up with the help of iTunes: Automatically Back Up and Manually Backup and Restore, each of which has a specific function. To back up automatically, you have several options:
- iCloud : This backup includes application data, device settings, messages, photos, and more as described above.
- This Computer : A full backup copy of iPhone is copied to the PC. This backup also includes music and movies that you didn’t purchase or download from Apple Music. Also, all content that is not loaded in iCloud will be backed up. This option is very useful when you do not have much space in iCloud or you are looking for a full backup before entering the beta phase.
Select This Computer to backup your iPhone to your computer. If you select iCloud, you will still be able to back up manually.
4- Encryption of local backups
If you are looking for more security and privacy when backing up your data, encrypting your backup data would be a good idea. Select Encrypto local backup or Encrypt iPhone backup. This also allows the passwords stored on the iPhone to be copied during the backup process. That way, you no longer need to re-enter passwords when restoring apps.
You can also store your personal health information and sports activity by enabling encryption. It will also save Apple Watch information, call history, web browsing history and WiFi settings.
Remember that encrypted backups do not include device password information and Face ID and Touch ID.
When you select the Encrypt local backup option, iTunes asks you for a password to use when decrypting data. Click the Set Password option. Never forget your password as you will have no choice but to restore the encrypted backups.
5- Backing up iPhone
When you select This Computer, regardless of whether or not you select the encryption option, the backup process starts automatically each time you connect the iPhone to a computer. Of course, you can always back up your iPhone manually. To back up manually, select Back Up Now from the Manually Back Up and Restore menu. If you have encryption enabled, you must also enter the password to start backing up.
When the backup operation of the iPhone is finished, under the Latest Backup section, you will see the date and time of today.
If you want to simplify the process of automatically backing up iPhone to Mac, enable the Automatically sync when this iPhone is connected at the bottom of the Summary section.

6- Manage backups
The PC has limited storage space, and you may have saved multiple copies of the backup on it. iTunes lets you manage and delete previous versions.
After opening iTunes, click the Edit or iTunes menu. Then go to the Preferences menu and the Devices tab. In the new window you will see a list of previous backups. The device name appears next to each backup, so you can distinguish iPhone backups from iPad or iPod. You can also see the date and time of the last backups.
If you see a lock icon next to the name of a backup, it means that the backup is archived or encrypted. To delete each backup, click on it and then select Delete Backup.
7- Archiving backups
In most cases, iTunes saves a backup copy of the iPhone to your computer by default. Whenever you make a new backup, it replaces the data of previous version. However, you can also archive each backup.
To use the archive feature, go to the Devices tab in Preferences and right-click on the backup you want. Then by selecting the Archive option from the new menu, you can lock the backup so that it is not replaced or deleted.
also read :
How do I fix my iPhone software problem?

Conclusion of iCloud and iTunes backup
As we mention, backing up your iPhone with iTunes and iCloud has its advantages and disadvantages. If you are looking for a complete backup of your phone, iTunes will be a better choice. Keep in mind that regular time periods are more important than backup tools.
Backup Apple Watch sports activity data
If you think creating encrypted backup is not worth the trouble, you are surely mistaken! Especially if you own an Apple Watch, you should definitely use Apple Encrypted Backup. Losing iWatch data can be very frustrating, but with encrypted backups, you can relaxed.
Make an encrypted backup of your old iPhone and use it to restore your data to the new iPhone. Then completely clean your Apple Watch and pair it with your new iPhone. Then you can access your previous sports activity and health data.

iPhone and iPad backup using third-party service providers
There is an important issue in the field of data security: if a file is backed up only once, it is not considered backup at all! Creating multiple copies of your data is really the only way to ensure that it is safe.
There are some free cloud-based services for backup such as:
- Dropbox
- Flicker
- Google Drive
- Microsoft OneDrive
These services provide a simple way to keep your personal images, documents, and other files safe. Almost all of these providers have auto-sync capability and will not interfere with iCloud performance!
Do you backup your personal data regularly? Please share your comments with us.